Home-made Meatballs

Wednesday, April 29, 2015

I know I promised all of you this recipe ages ago but I had been so busy...so sorry for that. I got an order from my neighbor for Spaghetti Bolognese with Chicken Meatballs for her family weekend dinner, and even though she didn't said she wanted home-made meatballs, I always like to experiment, so I searched for a few top-rated best meatballs recipes and combine them! After making the meatballs, I requested my maid to help to fry them as I need to pick up my daughter from school, and my MIL was at home for a visit. When I returned, I saw her waiting for me at the door munching the meatballs and asked for the recipe! ^^


Ingredients:

500g minced beef or chicken, or you could even combine both at half each
1/2 cup breadcrumbs
1/2 cup grated Parmesan cheese
2 tbs Worcestershire sauce
1/2 tsp dried ground basil
1/2 tsp dried ground oregano
1/4 cup minced onion
1/4 cup minced garlic
1 egg (stirred)
Olive oil enough to fry the meatballs (not deep fried)
*If your kids do not mind a bit of spice, you can also add in 1/2 tsp ground black pepper

Methods:
  1. Mix everything into a dough starting from top to bottom list (egg should be the last).
  2. If you want to hide in some veggies, you can ground 1/4 cup of carrot and add in, or even broccoli. Potatoes would also be a good addition.
  3. You can fry the meatballs or even bake them

These will be great for Bolognese sauce and also good on it's own, dip in ketchup or chili sauce. My kids adore these meatballs and as I'm writing this post, my son saw the photos and asked if I could make them again :)

Freezing and reheating method:

You can freeze them before or after frying/baking. If you are cooking (frying/baking) them first, please ensure they had really cooled before you throw them in the sealed freezer bags. If you are freezing them uncooked, you need to first freeze them on a tray and once they've hardened, you can take them into the freezer bags.

To reheat cooked meatballs, after thawing, you can either fry again just to refresh them or reheat in microwave between 30-60 seconds depending on quantity of meatballs. Or, if you are using them for Bolognese sauce, just pop them in the pot together with the sauce a few minutes before you turn off the fire.

Quick Quiche

Wednesday, April 1, 2015


Quiche, which is pronounced as "kee-chey" is a pie-like dish of an unsweetened pastry shell filled with custard made from eggs and milk, containing cheese and other ingredients such as vegetables, seafood and chicken/beef/ham bits. In other words, the main ingredients for a quiche is eggs, milk and cheese, you could still go away with the crust pastry. As the photo above, I baked it directly onto my pie-pan.

My motto in cooking is simple but flexible. I like one dish but can be varied into many other taste and look, and took the shortest time possible to be made. I first tried the quiche in mini bite-size using my mini muffin trays, it was a hit with my boys, including my husband, as all 2 young boys and the old one :) love to eat eggs! Then I also tried the standard muffin size. Quiches are good for breakfast and tea-time, but my boys can eat these any time of the day!


The recipe I'm going to share is the basic quiche recipe which then you can play and explore further.
I did try using beef strips too.


This smells MARVELOUS and taste SOOOOO HEAVENLY! You should really try it! So here goes the basic quiche recipe. The recipe given is for 6 standard muffin size.

Ingredient:

6 medium eggs (1 egg for each quiche)
3/4 cup milk (equal to 2 tbs for each egg)
1/2 tsp salt
A pinch of ground pepper and dried parsley
6 tbs grated cheese (equal to 1 tbs for each quiche)
Your choice of fillings

Method:
1. Beat the eggs, milk, salt, ground pepper and dried parsley together to get the basic custard
2. Oil the tray cups or pan you are using, please ensure you oil it well. You can use vegetable oil or butter
3. Fill 3/4 of each cups with the custard, then put in 1 tablespoon of your choice of fillings and 1 tablespoon of cheese. If you are not using any other fillings, you can double the cheese amount to just have cheesy quiches
4. Bake for 10-20 minutes depending on your oven, or until the top turn golden brown and the custard harden (cooked through)

The best things about quiches is, as you notice in the recipe, it's high in protein. 1 quiche equal to 1 egg! I've tried minced meat/chicken fillings which I stir-fried with a bit of olive oil (if you want to be healthy) or butter and dash of dried ground herbs. I've experimented with just steamed veggies such as the frozen mixed veggies (peas, carrots and corns), broccoli, asparagus, diced potatoes and cherry tomatoes. I've also explored with crabsticks and stir-fried tuna. Once I had left-over grilled chickens, I just shred and minced them then used as quiche fillings too!

For the herbs, you can play around with others apart from parsley - like oregano, basil, thyme, rosemary and marjoram. Marjoram taste almost like oregano actually. Or you can just maintain only the ground pepper, because I know some don't really like herbs while picky-eater kids' eyes will bulged out when they see those tiny green parsley *LOL*

I've also tried many cheese. Feta does wonders to quiche BUT you have to finish them the same day, and the best is all in one meal :) The reason is feta taste great but it makes the quiche becomes watery, hence easier to make you sick. Mozzarella and cheddar is the best choice, but I do like creamy camembert too. Brie is too light perhaps for quiches so I usually mix it with other cheeses.

The best quiches I had is either those mini muffin size because they are bite-size...ooooohhhhhh....so easy to just plop the whole thing in your mouth! Our next favorite is using the beef strips though it can be tricky. The strips are supposed to cover the cups but as it bakes, it will shrink and curl inside hence giving the look as you can see up there. Below are also some of my collections - simple cheesy ones (no other fillings) and just veggies which you can see the broccolis :)


You can freeze the quiches (except for those using feta cheese) as make-aheads.

Freezing and reheating method:
1. After the quiches are thoroughly cool, wrap them individually in plastic wraps before putting in a sealed freeze bag and freeze them.
2. To reheat, you need to take them out of the freezer and transfer them into the fridge at least 12 hours before the intended cooking time if you don't plan to eat them now. Else, you can straight-away reheat in the oven or microwave for 2 minutes. Reheated quiches cannot be kept long so you need to straight-away finish what you have reheated

Left-over BBQ?

Tuesday, March 24, 2015


Sometimes after a BBQ nite or BBQ party, we may still have a few left-over grilled beef, lamb and chicken, also veggies if you used them. Do not fret that this will have to go to the dumpster unless of course, they had turned bad the same day, or got contaminated. Other than that, they will make a great meal or lunchbox for the next day or even the next few days if you kept them sealed and frozen well. All you need is a little bit of creativity and innovation ;)


If your left-overs are cooked, meaning you have grilled them before freezing, you could thaw them first then lightly reheat them using small amount of oil. You could shred them first before 'stir-frying' or reheat as they are and shred afterwards. I like to add extra seasoning to disguise the 'yesterday's food' thoughts, so feel free to experiment using sauces, herbs, spices, or just the usual salt and pepper. You could also add in some veggies in the stir-fry, if you like. These are then serve with hot tortilla wraps, with fresh vegetables and sauces.


I also add them in fried rice and noodles which was a hit with my kids, and as mini pizza toppings!

Hope your family will enjoy these too, happy experimenting!

Simple Grilled Chicken

Wednesday, March 11, 2015


I've posted the recipe for the pasta dish in Simple Olio Spagetti so now is the time for the chicken's recipe. I got the idea when trying out Dominoes Pizza's chicken wings. The best chicken parts for grilling is usually either the wings or the drumsticks. You can choose to grill this in the oven, or if you have a bbq pit, or if you have none, than just fry them with just a liiiiiiitle bit of oil or fat (butter) enough not to make it to dry but also not too oily. They are best eaten on their own, which I know the kids would prefer, or with rice, or pasta or bread. If you have left-overs, refrigerate them and reheat the next morning for sandwiches.

Ingredients:

1kg chicken parts (usually you could get about 6 drumsticks or 8 wings), cleaned and pat dry with paper towels
1tsp ground/crushed black paper
1tsp dried oregano
1tsp salt
2tsb ground fresh garlic
2tsb olive oil
1tsb worcestershire sauce

Methods:

1. Mix all the marinates ingredients in a big bowl to get into a paste-like liquid before adding in the chickens
2. Give the chickens a good rub with the paste, making sure all mixed well
3. Transfer into a freezer bag, try to get as much air out before sealing then leave it to marinate in the fridge for 1 hour
4. Separate the chickens and keep the liquid in a separate bowl
5. While grilling or frying, keep on brushing the chicken with the liquid now and then. You can also bake them in the oven by arranging them in a tray-pan, pour the liquid about half a centimeter deep and turn the chicken once when the top side already brown to ensure the other side also get a bit brown

Freezing and reheating method:

1. Follow step 1-3 but instead of putting in the fridge, you can straight-away freeze them
2. To cook this, you need to take them out of the freezer and transfer them into the fridge at least 12 hours before the intended cooking time. Read more in Secrets of Frozen Food on freezing and reheating the chickens.

French Banana Beignets

Monday, March 9, 2015


When I first made these and shared it in my FB, some of my friends are interested and PM me for the recipe. Honestly, I've never heard or seen these before, but accidently found the recipe when I was looking for banana recipes. I love bananas...banana cake, banana muffins, banana stew or locally we called 'Sira Pisang', I guess. So what is beignet, but most importantly, how to pronounce it?

Ok, beignets or pronounce as 'beh-nye' without the strong 'h' sound, is a French deep-fried pastry with powdered sugar. The original beignet is just plain, but there are many variation now, chocolates, with cream filling, and of course...my favorite bananas :) There are also many shapes, and it's soft and fluffy like pop-doughnuts. In this variation, its a combination taste of our local 'Jemput-jemput Pisang' or famously known as 'Cekodok' and doughnuts. Kids love these, but I would advise not to serve this to a diebetic person as it is VERY VERY VERY sweet.

Ingredients:

2 cups of self-raising flour
1/2 cup sugar
1 tsp salt
1 egg
1 cup of mashed bananas
1/2 cup milk
2 tsb vegetable oil
Enough oil for deep-frying

Sugar coating:
1/2 icing sugar
1 tsp ground cinnamon

Method:

1. Mixed the dry items and wet items in 2 separate bowls until fully blended, then combined.
2. Drop spoonful of the batter into the hot oil and fry until golden.
3. Drain in paper towel and roll in sugar coating while still warm. You can also use dusting method instead of rolling

These cutie balls will be great for tea-time, with hot coffee or tea, or both!

Treasure Boxes

Sunday, March 8, 2015


I love cooking for my family, and I believe most of my readers are too. I devoted my whole attention and passion to provide good and healthy food for my kids especially, since my husband is working away in KL while all of us are in the north, so he could only get to try some of my food during the weekend. Cooking is like a stress-reliever for me. Each time I cook, even the same food, will never taste the same as I will always innovate the recipe. Apart from the fresh cooking during the weekend and the reheating of home-made make-ahead food in the weekdays, my other passion is to make great lunchboxes for my dearest daughter to school, which I called my 'Treasure Boxes'.


If you noticed, I'm not into the fancy cartoons or shapes or designs. It's all about the food. They should be good, healthy and of course tasty. What good will I get if I do all the fancy food stuff which my girl won't eat? Some of these food are make-aheads like the pasta, marinated chickens, quiches, muffins, soups and rice. It will take me max 10 minutes every morning to prepare this, most of the time is less and those times are usually to cut the fruits because I could reheat the food while doing that...we mommies are such a multi-tasker, aren't we?


Nisa's lunchbox will always have either fruits or veggies, or can be both, but I still let her have her occasional sweet treats like cakes and jellies. Nisa is a natural-born fruits and veggies eater, so I don't actually have any problems to force her eating those. In fact, I think she eats much healthier than me and she cannot live a day without having her bowls of fruits, so fruits are the staple in our fridge. She used to love fish but as she grows bigger, she started to push them aside. The worst food to feed her are eggs or anything made with lots of eggs like quiches or egg sandwiches, but she's the BIGGEST fan of pasta, any kind of pasta!

I can share some of the recipes when I have time to write again. Follow my FB page at https://www.facebook.com/bzmamaskitchen and you can request for the recipe you are interested to try out.

Simple Olio Spaghetti


On days the whole family want something simple but tasty, I'll make these. Ok, I have to admit that the chicken was pre-made, which means I always buy a bunch of drumsticks whenever I see them looking fresh at the poultry isle, then marinate and freeze them at home for my convenient use anytime in needs :)

There are many ways to marinate chickens, too many recipes which I won't be sharing in this post as this post is about - the spaghetti. Olio Spaghetti is by far the simplest but still maintain you as a great cook at home..haha! You may have heard Aglio, Olio and also Pepperoncino or Pepperoncini Spaghetti and wondered? Yes, they are all the same thing :)

The recipe below is for 2 adults (standard size meal) or 3 kids below 9 years.

Ingredients:
250g cooked spaghetti (set aside)
1/4 cup extra-virgin olive oil (can add up to 1/3 cup if you want more)
1 tsp minced garlic
1/2 tsp ground pepper
1/2 tsp dried basil flakes
1/2 tsp chilli pepper flakes (optional if you don't like it spicy, especially for kids)
Salt to taste

Method:
1. Heat up the oil and garlic, then add in the spaghetti. Stir and fold the spaghetti all over to ensure covered with the oil, then add in all the other ingredients which are the herbs, together. Keep on stirring to ensure all are mixed well.
2. Serve with cheese on top and either some fresh garden salad (if you are vegetarian) or grilled chicken as the picture or just garlic breads.

The best thing about Olio is, you can add in anything apart of its simple self. In these photos, you can see me adding cherry tomatoes. Add in some shrimps when heating the garlic and oil to have Shrimp Olio, or some squids too for a seafood one. Or at the end, instead of grilled chicken, you can put in grilled giant prawns with cheesy topping, or Portobello  mushroom like below, just simply anything! Enjoy!


Freezing Food IS Cool!

Sunday, March 1, 2015

When I was studying in Japan, each time I came back to Malaysia for holidays, I will packed some frozen local food to bring back so I could still enjoy the taste of Malaysia whenever I missed home. My parents would buy rendang, murtabak and other of my favorite local dishes, then we would freeze them in 1-person-portion in small plastic bags for 72 hours before my flight is due. The longer is the better actually. Next, we will pack them in polisterine box, sealed and this will travel with me for 6 hours flight to Narita, another 1 hours flight to Aomori and by road to Hirosaki, which will be almost 10 hours including the waiting time for each transportation schedule. I will quickly freeze them again, and these food will be kept for 6 months. Well, I have to admit, I didn't keep them up to 6 months, but it could last for more than a year, and being away from home, it still taste super-delicious to me! :)

I started to do home-made frozen food when I had my 3rd child. My maid did not want to continue her contract after 2 years of service, so I had to handle 2 small kids and a new baby alone at home. Even though it is 'pantang' or against the local rule for any post-delivered moms to eat cold food, I had no choice. Survival is more important, and that includes keeping me sane. Admit it mommies, we need our extra time, not only to spend more time with your family, but also to appreciate ourselves...we deserve it!


So, this is how my freezer usually look like, even now. I'll freeze my kids favorite food which are pasta, marinated chickens and ingredients for other 5-10 minutes recipes. Also curries and stews, only the gravy/soups. At times when I bake, it will have frozen muffins, bread puddings, quiches and buns.

So, how do you start a frozen food meal for your family? I've heard comments from my friends that their family doesn't like frozen food. Well, let's understand this, most restaurant food are also frozen, some with preservatives, and we are talking about home-made frozen food. Why does your family do not like frozen food? It's not the food, unless you really can't cook, but if you have been cooking fresh for them your whole life until you read this, and feeling tired and drained out, well, let me tell you this, it's not the food they hate, it's the 'ice' or 'freezer' tastes. Also, to some families is, the fact that you are serving the same food for a few consecutive days.

Then, how to make them accept frozen food?

1. Freeze it and reheat it well
There are ways to do it right and save you more time for yourself, if you appreciate yourself. I will share more on this in my post Secrets of Frozen Food

2. Do not serve it repeatedly
Imagine eating the same food at dinner table 2-3 days in a row? Of course, the first day you are serving it, it'll be a blast because you had just cooked it fresh. Then you happily freeze the left-overs, and to save your time, reheated it the next day and maybe the day after too. If you have picky-eater husband or kids or both, OF COURSE, they will know. Don't think they wouldn't notice the same chicken curry they had for 2 nights, do you? So, if you have left-overs, freeze it for next week, it won't get bad and in fact, for food that used lots of spices or herbs, it will taste even better! Think of mamak stall! :D

3. Similar but not
My rule is - home-made frozen food should not be the exact left-overs. If you have too much of a left-over, either freeze it and reheat it the next week, or else innovate your ideas and creativities to 'disguise' it.
When we have grilled lamb or chicken or beef for dinner last night and had left-overs, I will re-use them for either my kids' lunchboxes or home-meals. You can shred them, stir-fry a little adding a bit more herbs or just peppers, or you can even add sauces to turn them into sandwiches. In this photo, I packed tortilla wraps with the shredded grilled chicken left-overs and veggies. You could also add the shredded chickens in fried rice or noodles, or scattered on home-made pizza or quiches or omelettes...thousands of different ideas!

So, still thinking home-made frozen food is impossible?

Secrets of Frozen Food

If stored correctly, home-made frozen food can last between 3-6 months, depending on the food type. Keep in mind that food in the freezer very rarely goes “bad”, it’s the quality that starts to diminish because of 'freezer burn'. The longer the meal is in the freezer the longer it is exposed to opening and closing doors and susceptible to freezer burn. The microorganisms aren’t growing as they would be in a refrigerator, organisms are frozen. However, the longer you leave the dish in the freezer the less appealing it can become. As per my other post, I have eaten meals that have been in the freezer for over a year and still lived to tell about it though *LOL*

So how long you can freeze any food? Below is the general guidelines:

So, what is a freezer burn? Taken from Mr Wiki, Freezer burn is a condition that occurs when frozen food has been damaged by dehydration and oxidation, due to air reaching the food. This can happen when food is not securely wrapped in air-tight packaging. Freezer burn is NOT a food safety risk. The result, you have less tasty or 'prettier' food. So, the key here is - AIR TIGHT, and this lies in the containers you choose to use.

The secret to getting a delicious frozen food meal is thawing it the right way. Frozen food will taste best when it is back to room temperature, which in thawing it will takes more than 12 hours. You can thaw it outside the fridge if you are staying at home the whole day to check on the food now and then, or in the fridge. Casserole and lasagna type dishes will take 24-48 hours to defrost in the fridge; meat will take anywhere from 12-24 hours. Usually what I will do is, If I'd like to have the food for breakfast, I will take it out of the freezer and put in the fridge before going to sleep at night, or even while cooking dinner, if I already have plans for breakfast menu. The first thing in the next morning, I put it on the table, and than have my showers. Next, I can reheat them either by fire or just pop in the microwave/oven (depending on the food) while getting my kids ready. In less than 10 minutes, we would have our breakfast on the table! This also goes well for dinners for working moms. Before going out of the house in the morning, take out your 'future dinner' from the freezer into the fridge, then after work, just pop it into the microwave/oven...or you can even cook it on fire as usual.

For extra-sensitive-taste-buds and I-can-only-eat-local-food picky eaters, there's also a solution for our busy moms. Cook the curries, sambal, stews, soup separately without adding in the meat (beef/lamb/chicken) or seafood. Reheat the food on fire and once the liquid fully melted and return to its own usual texture, add in the meat or seafood. You can cut them upfront together with the veggies but store separately in the freezer, and thaw the same way as the gravy by taking them 12 hours upfront into the fridge. Before you start cooking, again thaw them using water as this will bring them to their natural state faster. This is almost similar method as you buying and using packed instant curries sold in the market, but the great thing here is, yours now is home-cooked :)

Dried Mixed Fruits Scones

I love scones and always can't get enough of them! The best scones are always freshly baked or you could bake in big batches then reheat them anytime you want to have them :) Scones don't get molded fast, unlike muffins or cakes hence you may not even have to freeze them unless you are planning to keep them for more than a week. They are very simple to make and yet let you have great breakfast of tea-time snacks every day! You can use raisins as the recipe usually requires, but as my daughter and husband always said desperately, "Mama, you always buying cookbooks, look at them while cooking but came out with something else!". The reason is, they always expected what they saw I was referring at in the cookbooks, but I always can't stick to the recipe and like to set out for an adventure by twisting it a bit :)
So for this recipes, I had some dried apricots, mixed raisins, dried blueberries and cranberries, also dates in the stock, hence I chopped them all to make half a cup and add them in. You can use less or more, depending on your preference. Enjoy!

4 cups of self-raising flour
2 large whole eggs (beaten)
Milk or Buttermilk mixed with the beaten egg, enough to make 1 1/2 cups of liquid
1/2 cup soften butter
1/2 tsp salt
1/2 cups mixed dried fruits (chopped)
1 extra egg for glazing (beaten)
Extra flour for rolling the dough

Mixed butter, salt and flour well to make them crumb-like, which is almost the same method use for making pastry sheets. Obviously I didn't take any photos while doing this (as my hands are busy! *LOL*) hence the photo below is courtesy of another web. The texture should be as the last photo:

Next, pour in the the egg and milk/buttermilk mixture together with the dried fruits, and get ready to roll! First roll the dough in the mixing bowl till it forms a round dough, before moving it to a lightly floured surface. Roll to about 2cm or 1 inch thick and cut with your cookie cutter. Place them on the lightly oiled or buttered baking tray, glaze with the extra egg on top then bake for 10-15 minutes or till golden brown.

Serve hot with cream cheese or if you prefer butter or cream, and of course, jam!

To freeze:
Make sure they had cooled thoroughly. Wrap each individual scones in either aluminium foil or plastic wrap before storing all in freezer sealed bags and put in the freezer. Remember, this is only if you need to keep them longer than a week. To reheat, thaw them for 30 minutes then bake them for 8-10 minutes or you can put them in the microwave about 8-10 seconds per scones. If reheated via microwave, you need to eat them while they are hot or they may turn rock-hard when they are cold.

Chicken Cacciatore

Monday, October 22, 2012

My family, actually the kids, love tomato-based food - soups, pasta, dishes...So I decided to try this new recipe but have to make a few changes by removing the wine which is used in the original recipe. This is the first time I'm trying, and I'm glad it's a hit in my family! The recipe is actually very simple, since it's using slow-cooker, so all you have to do is dump everything and check it again in 3-6 hours time :)

4 chicken thighs
1 can of tomato soup
2 bay leaves
2 teaspoon of chicken stock
2 teaspoon dried oregano
1 stalk of celery - diced
2 tomatoes - diced
1 carrot and 1 potato - sliced or diced, up to you
1 cup button mushroom - sliced or quartered
Sugar, salt and pepper to taste

Put in the vegetables (minus the tomatoes), bay leaves, dried oregano, first and the chicken on top, pour in enough water to cover the chicken and turn on the slow-cooker. If using low-heat, cook for about 6 hours but if high-heat cook about 3 hours.
Then, remove the bay leaves and half of the soup (water). Add in the tomatoes, tomato soup, chicken stock, sugar, salt and pepper, stir all and leave for about 15-30 minutes more before serving.

Since I have planted oregano, I used fresh ones. For the vegetables, you could also add in olives, sweet yellow and red pepper, eggplants or maybe others, if you are brave enough to try the varieties.

You can enjoy this either with spagetti, rice or bread :)

Wakame Udon/Soba


It's been a long time since I had the time for blogging, let alone blogwalking :P
But I've been asked a few time to share my recipe for Japanese style udon or soba in soup, so tonight, I tried to steal some time to blog this. The most important ingredient for this recipe is the 'dashi', which is actually the fish stock. There are varieties of fish stock used, but after trying a few, I think 'katsuodashi' is the most suitable for this dish. Next is also the 'shoyu' or soy sauce, and here I advise you to use Japanese brand Kikkoman instead of local Chinese or Malaysia soy sauce as it taste different, hence will give a strange taste to your soup.

Here are examples of katsuodashi sold in Jusco around Malaysia. These fish stock usually packed in small packets. All these things you could easily get from any Jusco stores.

These are wakame. The dried wakame packet is the exact one I bought at Jusco, but there are others as well. Since wakame is a type of seaweed, this is how it looks like when cooked (right):


Next is the shoyu:

It is also sold in small bottle in certain stores so if you rarely cook Japanese food, it is advisable to buy the small bottle, about 250-300ml if I'm not mistaken.

So here's the recipe for 3 persons:

3 cups of water
2 small packets of katsuodashi
3 packets of fresh udon
1-2 tablespoon of dried wakame
Shoyu
1 stalk of leek


First, rinse the udon under cold water before cooking it for 1-2 minutes in hot-boiled water, set aside. For the soup, boil 3 cups of water, then add in the 2 small packets of katsuodashi. Keep on stirring till all mixed, before adding in shoyu. I don't actually measure how much, as this is according to your own taste, whether you'd like it mild or salty. Last, add in the wakame and boil for 1-2 minutes, adding in half a cup of water if necessary. To serve, put in the udon in the bowl first before pouring in the soup. Chop the leek as garnishing, and you could also add in tempura or aburaage (sweetened deep fried tofu), or even fish cakes.

You could also use soba for this recipe, but my kids prefer udon. Itadakimasu!

Mama's Special Mee Hailam

Saturday, March 31, 2012

I called this Mama's Special Mee Hailam because my family loves this so much, and it's also special because you can put just anything out of your fridge! If you don't like beef or chicken, you can purely use seafood such as squids and shrimps, but you could also mix both seafood with beef or chicken, or have all of them together! For vegetarians, you can just used any veggies - peas, mushrooms, any green leaves, cabbages, baby corn, carrots...some of these or even all! That's the best thing about this recipe ;)

Here are the recipe, and you can choose whether you want to put all or some of the things in A list. Enjoy!


A list
1kg of yellow noodle
1 chicken breast cuts into cubes
200g of shrimps (you can choose to unshell or not)
200g of squids cut into rings
10 fishballs or chicken balls cut into halves
500g beef cooked in pressure cooker, keep about 2 cups of stock
A quarter of whole cabbage - sliced
1 carrot - sliced
Half a pack of peas/baby con - sliced
Half a pack of mustard - cut about 2 inches
1-2 tomatoes (depending on size) cuts into 8
Half a pack of oyster mushrooms  sliced
2 celeries - sliced

B list
2 tablespoon sesame oil
2 tablespoon blended onions with garlic mix
4 tablespoon oyster sauce
1 tablespoon thick and sweet soy sauce
2-3 tablespoon of corn flour mixed with half a cup of water

Heat up the oil and blended mix, then fry the chicken and seafood in List A till 3/4 cooked, before frying the veggies (please do not add tomatoes or the green leaves yet, it should be the last). If you are using beef with the stock, you can add in beef and stock now and mix everything which will look like a stew. Then, you can add the oyster sauce and soy sauce in, mix again. If you are not using the beef stock, you could use the chicken or beef stock cubes, but need to add 2 cups of water. Finally, add in the noodles, let it set first before adding the corn flour mixture. Turn the noodles and soup. If it's too thick, you can add in more water, but if it's too thin, you could add another 1 tablespoon on corn flour mixed in a bit of water. You can add in salt up to your taste.

Nice & Easy Tomato Rice

Saturday, August 20, 2011

It's fasting month, and one of a 'must-have' menu for my family is Tomato Rice :) No, we don't eat this every day, but my kids love this, they would eat a few helping. It's even nice on it's own. You could easily get the instant mixed packet, or could even do it yourslef, it's not that troublesome, really! The usually dishes that accompany it is Ayam Masak Merah (a mild chilli gravy chicken dish), or Kurma Daging (a brownish type of curry), or Ayam Madu (a sweeter version of Ayam Masak Merah which you add honey in the end), or Dhalca (a type of dhal curry with mixed vegitables, also could add either chicken, beef or lamb), and some veggies (sometimes added with pineapple) called Acar which is sweet and sour.

Here's my version of Tomato Rice:

3 cups of rice (preferably long grain)
3 diced fresh tomatoes
3 tbsp of tomato sauce/ketchup
1 can of tomato soup
1/2 can of evaporated milk
2 tbsp of ghee (could be replaced with butter)
3 cups of water
2 pandan leaves (if big size, just use one)
1 cinnamon stick
2 star anise
3 cardamom
3 clove
2 garlic and 1/4 onion blended
1 tsp salt

In the rice-cooker pot, melt ghee/butter, add in the mixture of blended garlic and onion, and all the herbs. Then, add in all the tomatoes (diced, soup and sauce/ketchup), mix them well before you pour in the milk. Mix again. Once nicely done, add in pandan leaves, salt and rice, and again you have to mix them well before adding in water. You can transfer the pot into the rice cooker and let it cook. Please remember to keep watching over it and fold the rice times to times so that it will mix evenly. Scatter some fried onions on the rice before serving.

Notes:
You could also replace 1 cup out of the 3 cups of water with chicken or beef stock, or else just use the instant cubes :) The original recipe include 1/3 cup of peas and and 1/3 cup of raisins, but my kids do not like them so they were excluded. You could add them in before transferring the pot to the rice cooker.

Double Strawberry Muffins

Friday, August 5, 2011

Another muffins that I've tried and my family simply lurrrrrrrrrrve these! The original recipe 1 cup of chopped strawberries but the first time I made it I used 2 and it was a hit! The 2nd time I made it I used 1 1/2 of quartered strawberries as I was too lazy to chop and also due to the size of the fruit since it's quartered. You can use strawberry or raspberry or orange yogurt drink to make it even tastier, or just use plain milk or yogurt if you prefer.


1/4 cup melted butter
1/2 cup milk or yogurt drink or yogurt
1 egg
1/2 cup brown sugar (can be replaced with white sugar)
1 3/4 cup of flour or self raising flour
1 tsp baking powder (if you are not using self raising flour)
1/2 tsp salt
2 cups chopped strawberries (can be reduced)

Mixed butter, egg, milk/yogurt and sugar. Then add in flour with baking powder and salt or the self raising flour. Using sifter, add in the strawberries and mix slowly and carefully. Bake for 18-22 minutes depending on your oven.

Herb Cheese Muffins

My lil sis complained that I've abandoned my cook blog *grin* so since I have some time today, I'm updating as much as I could first :) I'm passionate about muffins nowadays, due to it's very easy and my kids love them, been taking those as snacks to school.

I first tried this muffin when I was in Japan, it's my foster mom's original recipe which she said she created herself. Personally, I love her Maccha Muffins (Green Tea) more but my hubby loves these, and I really regretted not getting the recipe before returning to Malaysia. I tried creating this myself, but I used grated cheese instead of dried powdered ones like my mommy used. It turned out saltier, tasted also a bit different than hers, but I guess it's ok since my hubby still like it :) You can still replace the cheese with the powdered ones, it'll be drier and less salty if you like it that way like me, but if you love cheese buns, you'll love using grated cheese. Enjoy!

3 cups self raising flour
1/3 cup melted butter
2 eggs
1 1/2 cup milk
1 cup cheese (powdered or grated)
1 tsp oregano
1 tsp basil
1 tsp parsley
* 1 tsp chives (optional)

Mixed butter, egg and milk together. Add in flour and spices. If you are using an electric mixer, turn it off before adding the cheese. Sift cheese in till all are mixed evenly. Bake between 17-25minutes depending on your oven, or when the toothpick comes out clean if you poke in the middle.

Moist Blueberry Muffins

Thursday, June 9, 2011

Hey there!

Sorry, I've been kinda busy lately...well, being a Busy Mama :) I think I've neglected my blog for quite some time, but doesn't mean I haven't been cooking *wink wink*

Anyway, I'm in a 10 days vacation leave but instead of travelling, I just spend my time at home cuddling with the kids :) Nisa requested for blueberry muffin, and I must admit I haven't been baking for years! I do have some fresh blueberries, since Nisa loves eating them, but I've frozen them to store them longer...blueberries are hard to get here in Malaysia. As usual, I surf the web for the recipe, also reading some tips and comments by people who tried baking them, and here's my own recipe...I created it myself based on what people had tried.

Before you try this, please ensure all the ingredients are out from the fridge at least 1 hour prior to the starting point. I like moist-type of muffin, so this one is not the fluffy or crumbly type. I used orange flavor yogurt drink to replace milk in normal recipe, but you can also use strawberry flavor as these two flavor will compliment the blueberries. If you don't like moist type, you can stick to the normal mlik, and if you just like plain blueberry flavor but moist type muffin, you can use plain yogurt or yogurt drink. I don't like cinnamon or nutmeg tastes, so you can see here I don't put the powder in, but you can put them in if you like, half a teaspoon. Also, I used brown sugar instead of white, but you can use white sugar if you like, it'll be sweeter, and I don't really fancy sweets :) I only use the toaster oven with no temperature control, so I'm sorry I can't give you the exact oven temperature. Enjoy!


2 cups of flour
2 teaspoons of baking powder
1/2 teaspoon of salt
1/2 cup of butter
1 cup of brown sugar (can be replaced by white sugar)
2 large eggs beaten
1/2 cup orange flavor yogurt drink (can also use strawberry flavor or plain)
2 cups of fresh/frozen blueberries (please make sure they are dry out)

In the mixing bowl, use the mixer to beat butter and sugar till light and fluffy, then add in eggs followed by yogurt drink. In another bowl, mix flour, baking powder and salt, then slowly added in the batter mixture. If you are adding in the spices, you can add it in now. Pre-heat the oven. Once the batter are well-mixed, slowly and carefully fold in the blueberries. Fill medium-sized cups 2/3 full and bake for 30 minutes in an oven toaster, or till the muffins spring back. You should also check if the middle are well-cooked by poking in, as this is a moist type and I used double blueberry volume, so it tend to be uncooked in the middle.

The recipe will make 12 medium sized muffins. You should eat them freshly baked, but if you can't finish them, you can store them in air-tight containers for 2-3 days. If you can't finish them still, you can individually wrap them with plastic wrap and put in air-tight containers or zipped plastic bags, and freeze them in the freezer. They will last for 3 weeks. To reheat them, take them out 8 hours before you are going to eat them so they'll defrost themselves naturally first. Then, unwrap them, and reheat either in the oven or microwave for 5-8 minutes, according to the type. It may take shorter time for certain types of oven/microwave.

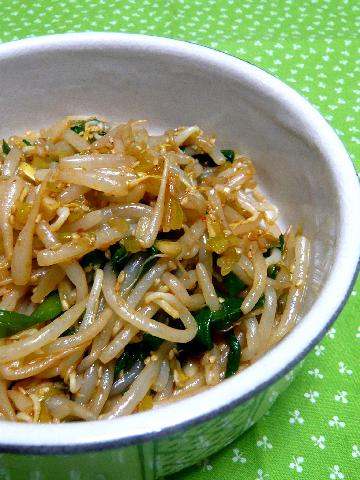
Stir-fried Beansprout

Tuesday, April 12, 2011

This is another healthy and easy meal which my family love. You can eat this with plain rice or just on it's own (a good dieting food *wink wink).


1 pack of beansprouts - cleaned and toss to dry
A little chives - cut
1/2 onion - sliced thinly
2 tablespoon of sesame oil
2 tablespoon of light soy sauce
Sesame seed and pepper to taste

Optional:
1/2 stick of carrot - sliced thinly
1/2 green pepper - sliced thinly

Heat up sesame oil and fry onions. Toss in the beansprouts and other vegetables, adding in soy sauce. You could add a little water if you like, but not so much. Lightly stir-fry the ingredients and finally add in sesame seed and pepper to taste.

Egg Soup

Saturday, March 19, 2011

This usually will be my last resort meal, if I really don't have any idea to cook, or don't have much time, or if my Nisa wanted to eat instant noodle which she call 'curly noodle' but I won't let her eat it due to MSG. So I invented this recipe and combine with the original egg soup recipe. You can actually eat this on it's own, it's very good specially when you or the kids are sick. Or else, you can combine it with noodles. If you thicken it more with cornstarch, you can turn it into some kind of hotplate me - some call it Hokkien Mee or Hong Kong Mee, I don't really know the exact, but they'll use the crispy egg noodle and top with this sticky gravy.


4 cups of chicken broth
1 tablespoon of cornstarch mix in a little water enough to dissolve it
1 tablespoon of light soy sauce
1-2 slice of chicken fillet cut into cubes or sliced thinly
Half a stick of carrot sliced thinly
1-2 leaves of chives sliced thinly
2 grade A eggs lightly beaten
5 Chinese Spices Mix and salt

Optional:
1-2 dried mushrooms sliced thinly
2 tablespoon of frozen peas
1 tomato cut into 8 slices
1-2 baby asparagus cut
2-3 baby corn sliced
A few prawns removed the shells
1-2 squids sliced into rings
Noodles

Heat the broth and once bubbly, add in everything except for the eggs. When everything is cooked, slowly add in the beaten eggs and keep on stirring the soup. You can thicken it more with cornstarch mixture up to your preference. Serve hot to warm your heart :)

Salmon Steak

Saturday, March 12, 2011

The most flexible and not to mention easiest, nutricious, delicious, no hassle recipe of all must be salmon steak. My family just love salmon, it's a must-have fish in our freezer, either the steak or fillet, and the fish head with bones. Usually, I get my stock at Jusco. If they have a 50% discount on the rack, I'll grab a few but choose the best among those on sale. The quality is better than those at hypermarket even at lower price, but of course you can't beat the fresh ones, which is VERY hard to get in Malaysia.

There are many ways to grill a salmon, up to your creativity and taste. You can even grill it just own it's own but sprinkled lightly with salt on a non steak pan, or use a bit of butter/olive oil. The fish it self have lots of oil. Or else, you can use teriyaki sauce, or Japanese shoyu, or any herbs from pepper to paprika, parsley, basil, rosemary, cayenne, or just garlic salt. You can choose to marinate longer time or just sprinkle/roll the fish with the herbs/sauce. Fun isn't it?


150-250g of salmon (1 big steak or 3 fillets)
1 tablespoon of olive oil
Aluminum foil (if necessary)
Herbs or sauce of your choice

Pat the fish dry with kitchen paper. Depending on your preference, sprinkle/roll or marinate the fish with herbs/sauce of your choice. You can try mixing a few too. Heat the oil in a pan or you can use the grill pan, then cook the fish, about 1-2 minute for each sides. You can continue till the fish is cooked, or for me, I usually will scoop it out and continue grilling in the oven, either on the grill rack with the tray at the bottom as the fish oil will start dripping, or else you can wrap in aluminum foil with 1 slice of lemon and some vegetables like asparagus, mushrooms, potatoes, broccoli, beans, carrots, tomatoes and others. An great meal for the family!

BZ Mama's Kitchen Copyright © 2009 Designed by Ipietoon Blogger Template for Bie Blogger Template Vector by DaPino